![[EN] Appliance Management Settings and Details in HPE Morpheus Enterprise](https://kadirkozan.com/wp-content/uploads/2026/05/hpe_morpheus-ikona.jpg)
HPE Morpheus Enterprise is a powerful hybrid cloud management platform that enables organizations to manage their private clouds, public clouds, virtualization platforms, Kubernetes clusters, and automation processes through a single centralized interface.
For a platform that plays such a central role, the Administration → Settings screen is not merely a place where a few basic system parameters are defined. On the contrary, it forms the foundation of many critical areas including security, accessibility, integration, performance, user management, notification mechanisms, and cost management.
For this reason, every parameter on the Morpheus Settings screen must be carefully evaluated. A misconfigured Appliance URL can break agent communication; a weak password policy can open the door to brute-force attacks; an incorrect SMTP setting can prevent system notifications from reaching users; and cloud sync processes running too frequently can create unnecessary API load on both the Morpheus appliance and the connected cloud platforms.
This article covers the settings on the Administration → Settings screen of HPE Morpheus Enterprise, along with technical explanations, the meaning of current values, potential risks, and recommended best practices.
The following sections follow the structure of the tabs on the Settings screen exactly. At the end of each section, you will find a short “recommended configuration for production environments” summary.
If you are setting up for the first time, go through the sections in order; if you are reviewing an existing system, you can jump directly to the relevant tab.
A) Appliance Settings
The Appliance Settings section is one of the most critical areas that determines the fundamental operational behavior of the Morpheus appliance. The settings made here directly affect many operational processes, from agent communication to API access, from synchronization frequency to data retention policies.
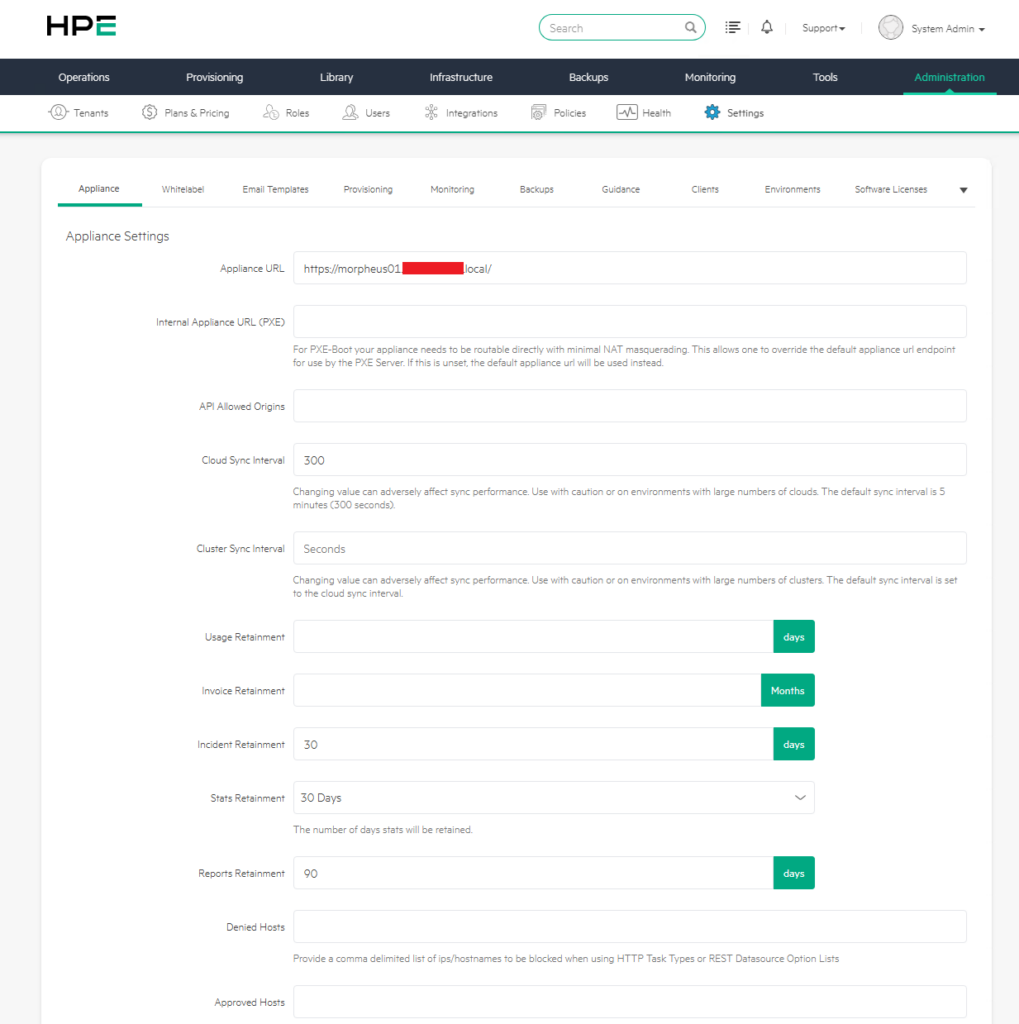
1) Appliance URL
The Appliance URL is the main address used to access the Morpheus appliance. This URL should not be thought of merely as the address from which users access the web interface. The Morpheus Agent installed on provisioned virtual machines also uses this address when communicating with the appliance.
In addition, this URL is referenced in email notifications, webhook calls, API connections, and some automation processes.
For this reason, in production environments, a meaningful and persistent FQDN must always be used instead of an IP address. For example:
https://morpheus.company.comOne of the most important considerations here is the SSL certificate. The certificate used must match the Appliance URL exactly.
If this FQDN does not appear in the certificate’s common name or subject alternative name fields, certificate errors may occur in agent connections or user access.
Recommendation: In production environments, the Appliance URL must be correctly resolved in DNS and supported by a valid SSL certificate signed by a corporate or public CA. Self-signed certificates should only be preferred in test and lab environments.
When an IP address is entered during initial installation and later switched to an FQDN, agents on previously provisioned VMs will continue to connect to the old IP and eventually fall into “unmanaged” status.
If you are planning a URL change, always prepare DNS first, then reconfigure existing agents with the new URL.
2) Internal Appliance URL for PXE
This field is particularly important for bare-metal provisioning and PXE boot scenarios.
If the Morpheus appliance and bare-metal servers are in different network segments, or if there is an architecture running behind NAT, an alternative URL may need to be defined for accessing the appliance during PXE boot.
If the field is left blank, Morpheus defaults to using the Appliance URL value. However, if servers performing PXE boot cannot reach this URL, the provisioning process may fail.
Recommendation: In environments where bare-metal provisioning is not used, leaving it blank is normal. However, in architectures where physical server provisioning is performed, the address from which the PXE network can reach the appliance must be tested, and if necessary, the Internal Appliance URL must be defined separately.
3) API Allowed Origins
The API Allowed Origins field is used for CORS (Cross-Origin Resource Sharing) configuration. If an external web application needs to access Morpheus APIs through the browser, the relevant domains must be added to this field.
This setting is sensitive from a security perspective. Overly broad CORS permissions can cause Morpheus APIs to be called from unwanted sources.
Typical use case: Access to the main appliance URL in the DMZ may not be possible from an isolated provisioning VLAN due to egress control. In this case, you can provide the appliance’s internal IP or internal DNS name directly as the internal URL.
Recommendation: This field must absolutely not be left wide open with a wildcard. Only trusted domains that genuinely need API access should be added. For example:
https://portal.company.comNever write
*(wildcard) in this field. Only add domains that you trust and have under your control. Otherwise, in XSS scenarios, an attacker can make authorized calls to the Morpheus API through the user’s browser.
4) Cloud Sync Interval
The Cloud Sync Interval determines how often Morpheus pulls inventory and status information from connected cloud platforms. Data from VMware, AWS, Azure, Google Cloud, or similar platforms is updated at this interval.
The current value of 300 seconds (5 minutes) is a reasonable default for most environments.
Lower values provide more up-to-date data but increase the number of API calls.
Higher values reduce API load but cause delayed updates to inventory information on Morpheus.
For example, a 60-second value may be useful in small and dynamic environments. However, in environments with many cloud integrations, thousands of VMs, or public cloud accounts with strict API limits, this value can lead to performance issues.
Recommendation: 300 seconds is appropriate for small and medium environments. In large enterprise environments, 600 seconds or higher values may be considered. Public cloud API limits and Morpheus appliance performance should be regularly monitored.
In large-scale VMware deployments with thousands of VMs, a 300-second sync can create noticeable API pressure on vCenter.
In such cases, starting with 600 seconds and reducing it if needed is healthier.
5) Cluster Sync Interval
The Cluster Sync Interval determines the synchronization frequency for Kubernetes and similar cluster environments. If the field is left blank, the Cloud Sync Interval value is used.
In architectures with many Kubernetes clusters, continuous calls to cluster APIs can create additional load on both the Morpheus side and the cluster control plane.
Recommendation: If many Kubernetes clusters are managed, this value can be set to a more controlled value such as 600 seconds, independent of the Cloud Sync Interval.
Manages the synchronization frequency of Kubernetes and other cluster types separately.
Uses the Cloud Sync Interval value when left blank.
Since pod and node counts can change very quickly in Kubernetes environments, configuring this field separately often makes sense.
If you are managing dozens of clusters, raising this value to 600 seconds gives breathing room both on the Morpheus side and on the Kubernetes API server side.
6) Usage Retainment
Usage Retainment determines how long resource usage data such as CPU, RAM, disk, and similar will be retained. This data is particularly important for chargeback, showback, capacity planning, and historical consumption analysis.
A very short retention period makes it difficult to perform retrospective cost and usage analysis. A very long retention period can increase database size.
Recommendation: In architectures using chargeback or showback, retaining at least 6-12 months of usage data is useful. In environments where financial reporting is performed, this period should be determined in line with the organization’s audit and reporting policies.
| Setting | Domain | Default | Recommended |
|---|---|---|---|
| Usage Retainment | CPU/RAM/Storage usage data | Default | 180–365 days |
| Invoice Retainment | Billing records | Default | 12–24 months |
| Incident Retainment | Monitoring events (incidents) | 30 days | 60–90 days |
| State Retainment | Performance metrics (stats) | 30 days | 30–60 days |
| Reports Retainment | Generated report files | 90 days | 90–180 days |
The point to be careful about here is: as retention periods get longer, the database size grows, and backup/restore times increase.
Especially before increasing the State Retainment field above 60 days, make sure there is sufficient capacity on the database disk.
In environments where chargeback/showback reporting is critical, do not hesitate to be generous with the Usage and Invoice fields—you cannot bring back the past.
7) Invoice Retainment
Invoice Retainment determines how long billing data will be retained. This field is particularly important for annual comparative cost analysis, budget planning, department-based consumption reports, and audit processes.
Recommendation: A retention period of 12-24 months is generally appropriate in corporate environments. The needs of finance, IT, and audit teams should be evaluated together.
8) Incident Retainment
Incident Retainment determines how many days the event records generated by the monitoring system will be retained.
The current value of 30 days may be sufficient for basic operational tracking.
However, if SLA reporting, root cause analysis, or long-term incident trend analysis is being performed, 30 days may be insufficient.
Recommendation: In production environments, a minimum of 90 days should be considered; in architectures with regulatory or SLA requirements, 180 days or longer periods may be considered.
9) State Retainment
State Retainment determines how long performance statistics and historical metrics will be retained. Long-term metric retention is valuable for capacity planning but increases database size.
Recommendation: A balanced value should be chosen based on the size of the environment. If long-term state retention is to be used in large environments, database capacity and maintenance processes must be planned separately.
10) Reports Retainment
Reports Retainment determines how long generated reports will be kept in the system.
The current value of 90 days may be considered reasonable for most operational environments.
Recommendation: If reports are being produced for financial or audit purposes, it is recommended that reports be stored not only within Morpheus but also in an external document management or archive system.
11) Denied Hosts
The Denied Hosts field defines the list of IPs or hostnames to be blocked from access for features that can establish external connections, such as HTTP tasks or REST datasource option lists.
This field provides a critical layer of defense, especially against SSRF (Server-Side Request Forgery) attacks.
A malicious or misconfigured automation could attempt to access sensitive internal services through the Morpheus appliance.
Some targets recommended for blocking include:
169.254.169.254- Cloud metadata endpoints
- Internal management network IP ranges
- Vault, secret manager, or sensitive API endpoints
Recommendation: Denied Hosts must be evaluated in production environments. Blocking metadata endpoints is particularly important in public cloud environments.
Why is this so important? In an SSRF attack, an attacker can trick the application into making requests to sensitive services on the internal network (for example, the AWS metadata endpoint 169.254.169.254).
Through this method, IAM credentials can be stolen.
The Denied Hosts list forms the first line of defense by blacklisting such critical addresses.
11) Approved Hosts
Approved Hosts is a whitelist mechanism that works the opposite of Denied Hosts.
If this field is left blank, only the Denied Hosts list is considered.
However, if Approved Hosts is populated, Morpheus can only access the hosts specified here.
This approach is highly valuable in environments requiring high security.
Example:
api.company.cominternal-api.company.comvault.company.com
Recommendation: In finance, government, healthcare, or high-security enterprise architectures, the whitelist approach should be preferred whenever possible. This ensures that automations only access approved systems.
In production environments, prefer the Approved Hosts (whitelist) approach whenever possible. Calls to unknown or accidentally typed addresses are automatically blocked. Combine list management with a change management process.
12) Exchange URL
The Exchange URL is the address used to access Morpheus Exchange content.
By default, https://share.morpheusdata.com is used.
Plugins, integrations, and community content can be obtained through this platform.
In air-gapped environments without internet access, this URL can be changed and an internal Exchange source can be used.
Recommendation: The default value can be used in environments with internet access. However, in air-gapped environments or environments where external connections are prohibited due to regulations, the internal repository approach should be preferred.
12) Skip Agent Install
The Skip Agent Install setting determines whether the Morpheus Agent will be installed on provisioned VMs. The current OFF state means the agent will be installed automatically.
The Morpheus Agent provides many capabilities, such as collecting guest OS metrics, running automation scripts, log collection, and workflow task execution.
If this setting is turned on, the agent is not installed. As a result, many features at the guest OS level are disabled.
Recommendation: In production environments, it should generally remain off, meaning the agent should be installed.
Turning it on should only be considered for special systems that have very strict security policies or where agent installation is not allowed.
13) Enable SSL Verification of Agent
This setting determines whether the Morpheus Agent will verify the SSL certificate when communicating with the appliance.
The current OFF state may be acceptable for test environments.
In production environments, the agent must verify the appliance certificate. Otherwise, a weak structure is created against man-in-the-middle attacks.
Recommendation: It must absolutely be ON in production environments. For this, a valid SSL certificate compatible with the Appliance URL must be used, and agents must be made to trust this certificate chain.
When this setting is left OFF, traffic between the agent and the appliance is technically encrypted, but an attacker in the middle can present their own fake certificate and perform a MITM (Man-in-the-Middle) attack. In production, install a certificate signed by a valid CA and set this option to ON without fail.
14) Disable SSH Password Authentication
This setting determines whether SSH password authentication will be disabled on provisioned Linux VMs.
When OFF, connections can be made with both password and SSH key. When turned ON, only key-based authentication is accepted.
Recommendation: Turning this setting on for production Linux systems is a strong step in terms of security.
SSH key management should be handled together with Morpheus Cypher, Vault integration, or a centralized secret management solution.
15) Default Appliance Locale
The Default Appliance Locale determines the default language of the Morpheus interface. If not selected, the user’s browser language is used as the basis.
Leaving this field blank may be more flexible in multinational teams. However, in corporate architectures with a single language standard, for example English can be set as the default language.
Recommendation: Leaving it blank is more appropriate for global teams, while selecting a common language is more appropriate for standard corporate operations teams.
Determines whether SSH password authentication will be disabled on provisioned Linux VMs. When set to ON, newly provisioned servers can only be accessed via SSH key.
This is one of the most effective defenses against brute-force attacks. It is also almost mandatory for compliance requirements such as PCI-DSS and HIPAA. Before turning it on, make sure your SSH key management (preferably through Cypher or Vault integration) is ready; otherwise, you may lose access to your own servers.
16) Default Console Gateway
This setting allows VM console connections to be routed through a specific worker node. It is used especially if the appliance and VM networks are in different segments, if access is required through the DMZ, or if console traffic needs to be routed to a separate node.
Recommendation: A console gateway architecture should be planned in large and segmented network architectures. Leaving it blank is normal in small environments.
17) Max Option List Size
Max Option List Size determines the maximum number of items to be displayed in dropdown menus or REST datasource option lists.
The current value of 1000 is a balanced choice for most environments.
If this value is increased too much, browser performance and server response times may be negatively affected.
Recommendation: The value of 1000 should generally be preserved.
For very large lists, instead of increasing the value, filtering, search, or a dynamic datasource approach should be used.
The maximum number of items that can be displayed in dropdown menus, REST datasources, and option lists. The default value is 1000, which is optimal for most scenarios.
Raising this value above 10,000 will severely slow down both the browser and the appliance. If you need to work with very large lists, prefer a search/filter-based form approach instead of a dropdown. Scrolling through 5000 items is not practical anyway.
18) Dashboards to Display
This section determines the dashboards users will see in the Morpheus interface and their order.
For example, screens such as Default Home Dashboard, Cloud List Dashboard, and Cluster List Dashboard can be managed here.
Recommendation: Dashboard ordering should be designed according to user roles. Infrastructure and monitoring-focused dashboards can be prioritized for operations teams; cost and billing dashboards for finance teams; and cluster and automation dashboards for platform teams.
My practical tip: Adding the Inventory Dashboard, Cost & Billing Dashboard, and Capacity Planning Dashboard would also be useful for users in different roles. Having the Cost Dashboard at the top of a Morpheus interface that your finance team views daily significantly increases product adoption.
B) Tenant Management Settings
Tenant Management Settings controls the multi-tenancy structure of Morpheus.
Multiple customers, departments, business units, or project teams can be managed in isolation on a single Morpheus appliance.
This section is critically important especially for MSPs, large enterprises, holding structures, and multi-department organizations.
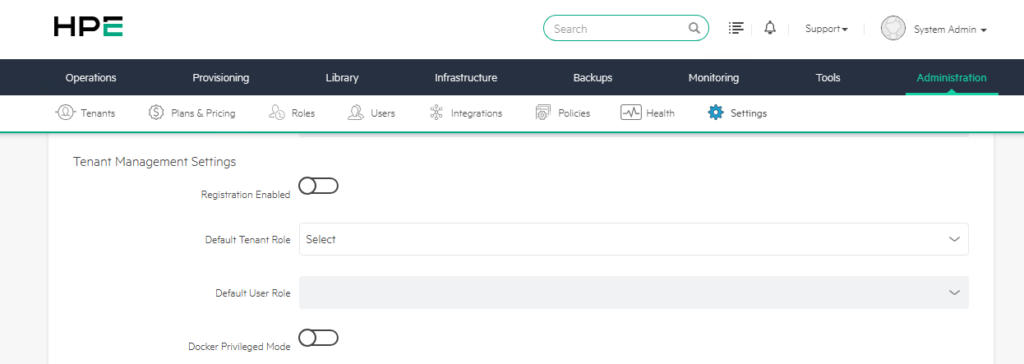
1) Registration Enabled
Registration Enabled determines whether users can create their own tenant registrations.
The current OFF state is the correct approach for corporate environments. Because the tenant creation process should generally be done in a controlled manner, with resource access, roles, and quota policies being determined by admin teams.
Recommendation: In internal private cloud environments, it should remain OFF. Turning it on may be considered in MSP or self-service public cloud-like architectures.
Controls the self-service tenant registration feature.
In the OFF position, only admins can create new tenants; this is the correct setting for corporate environments.
When set to ON, users can create their own tenants via the registration page, which is more suitable for MSP (Managed Service Provider) and public cloud scenarios.
| Scenario | Recommended Value | Rationale |
|---|---|---|
| Internal Private Cloud | OFF | Controlled tenant management is essential |
| MSP / Service Provider | ON | Speed of self-service onboarding |
| University / Research | OFF | Manual onboarding is preferred |
| Hybrid Cloud (Enterprise) | OFF | For IT governance purposes |
2) Default Tenant Role
Default Tenant Role determines the role template that will be automatically assigned to newly created tenants. This role controls which clouds, groups, instance types, and resources the tenant can access.
The point to be careful about here is: the distinction between tenant role and user role concepts. Tenant role determines the tenant’s platform-level access, while user role determines the user’s permissions within the tenant.
Recommendation: A least privilege approach should be adopted. Instead of giving broad permissions to new tenants, a limited default role should be assigned and expanded as needed.
3) Default User Role
The Default User Role determines the role to be assigned to the first user created within a new tenant. Roles such as Tenant Administrator, Standard User, Read-Only User, or Self-Service User can generally be used.
Recommendation: If the tenant self-service model is not being used, this field should be configured carefully. Instead of automatically giving full authority to every first user, a role aligned with the organization’s onboarding process should be assigned.
Determines the role template to be automatically assigned to newly created tenants. There is an important distinction here: While the Tenant Role determines the tenant’s authority on the platform (which clouds, groups, and instance types it can access), the User Role controls the user’s authority within the tenant. They are different layers and if confused can lead to unexpected access issues.
Keep the default role as restrictive as possible. Define a minimum-privilege template like “Tenant-Restricted” and assign it as the default.
You can elevate the privileges of tenants that need it later; but giving unnecessary privileges is a security debt that is difficult to reverse.
4) Docker Privileged Mode
Docker Privileged Mode determines whether tenants can run privileged containers. This setting is extremely critical from a security perspective.
When privileged mode is turned on, the container can have very broad permissions on the host system. There is a risk of access to the host kernel, devices, and some system resources. In multi-tenant environments, this can seriously weaken tenant isolation.
Recommendation: It must absolutely remain OFF in multi-tenant production environments. It should only be turned on carefully in environments using a single tenant, isolated, trusted, and with specific system-level container needs.
Pay special attention to this setting!!! This is one of the most critical security switches on the Settings screen.
When set to ON, tenants are allowed to run privileged Docker containers, which means containers can access the root privileges of the host system.
When privileged mode is enabled, the access scope of containers becomes roughly as follows:
• Access to the host kernel — system-level interventions become possible. • Direct access to all devices — raw access to disks, GPUs, network interfaces. • Container escape attacks become much easier. • In a multi-tenant environment, one tenant can interfere with another tenant’s containers.
My recommendation: In a multi-tenant environment, this setting must definitely remain OFF. It can only be turned on in single-tenant usage, Docker-in-Docker (DinD) test environments, or completely isolated, trusted lab installations. Before making this decision, you should definitely consult the security architect on your team.
C) User Management Settings
User Management Settings includes password policies, session durations, and account security settings for Morpheus’s local users.
If external identity providers such as LDAP, Active Directory, or SAML are being used, some password policies can be managed by the identity provider. However, this area is still important for local users and fallback admin accounts on Morpheus.
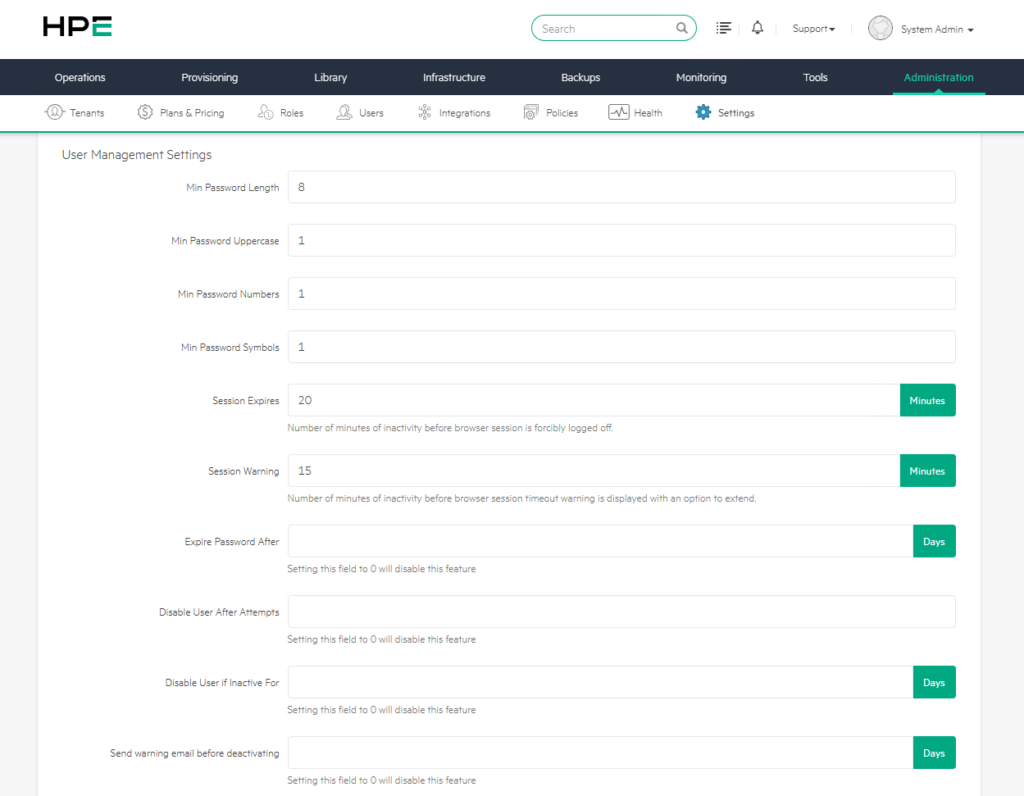
1) Min Password Length
The current minimum password length of 8 characters is a basic security level, but it is now considered weak for modern production environments.
In today’s password security, length is a more effective factor than complexity. A complex 8-character password can be cracked more quickly with modern attack tools, while a 14-16 character passphrase provides much stronger protection.
Recommendation: In production environments, the minimum password length should be at least 12, ideally 14-16 characters.
| Standard | Min. Length | Notes |
|---|---|---|
| NIST SP 800-63B | 8 characters | Modern, length-focused approach |
| PCI-DSS v4 | 12 characters | Payment card industry requirement |
| CIS Benchmark | 14 characters | Hardening standard |
| ISO 27001 | 8–12 characters | Depending on risk assessment |
| Morpheus default | 8 characters | Passable level, insufficient |
NIST’s modern recommendation is clear: password length is much more important than complexity.
While a complex 8-character password can be cracked within hours with modern GPUs, a relatively simple 14-character password is practically uncrackable.
We recommend setting a minimum of 12, ideally 14–16 characters for production environments.
2) Min Password Uppercase, Numbers, and Symbols
These settings determine the minimum number of uppercase letters, numbers, and symbols in a password. The current use of a value of 1 for each is in line with classic complexity policy.
However, relying solely on complexity rules is not sufficient. Users often use predictable patterns. For example, Password2026! may look technically complex but is easy to guess.
Recommendation: Complexity rules can be maintained, but the real security improvement should be achieved by increasing the minimum length and using MFA if possible.
3) Session Expires
Session Expires automatically closes the user’s session when they remain inactive for a certain period.
The current value of 20 minutes is a reasonable balance between security and user experience.
Very short durations negatively affect user experience. Very long durations create security risks due to sessions left open.
Recommendation: 15-30 minutes is appropriate for general enterprise environments. 10-15 minutes may be preferred in finance, healthcare, or regulation-heavy environments.
4) Session Warning
Session Warning ensures that the user is warned before the session closes.
If Session Expires is 20 minutes and Session Warning is 15 minutes in the current configuration, the user is warned approximately 5 minutes before closure.
Recommendation: The warning duration should be set to notify the user 2-5 minutes before the session closes.
5) Expire Password After
This setting automatically expires passwords after a certain number of days. In modern security approaches, mandatory periodic password changes are not always recommended.
Because users often produce predictable password variations.
For example:
Password1! → Password2! → Password3!This situation can weaken security rather than strengthen it.
Recommendation: If there is no compliance requirement, this field can be left blank. Instead, it is more effective to focus on MFA, strong password policy, leaked password checking, and account lockout mechanisms.
6) Disable User After Attempts
This field locks the account after failed login attempts. Leaving it blank is a serious security vulnerability because it can allow unlimited password attempts.
Recommendation: It must absolutely be enabled in production environments. 5 failed attempts may be appropriate in standard corporate architectures, and 3 failed attempts in high-security environments.
Leaving this field blank means you are open to unlimited brute-force attempts.
An attacker can try millions of passwords sequentially with automated tools, and the account never gets locked.
In a production environment, not leaving this field blank is not a choice but a necessity.
| Risk Profile | Recommended Number of Attempts |
|---|---|
| High security (finance, critical infrastructure) | 3 attempts |
| Standard corporate | 5 attempts |
| Internal / Lab | 10 attempts |
7) Send Warning Email Before Deactivating
This setting ensures that a warning email is sent before the accounts of users who have not logged in for a long time are deactivated. It is especially important for dormant account management.
Dormant accounts pose a security risk. Accounts that belong to people who have left the organization, changed roles, or have not been used for a long time can be targets for attackers.
Recommendation: The following structure makes sense for production environments:
Disable User if Inactive For: 90 Days
Send Warning Email Before Deactivating: 7 Days
The main rule is:
Warning Days < Disable DaysThat is, the user should be sent a warning a reasonable time before the account is deactivated.
Recommended Standard Configuration (Production)
Disable User if Inactive For: 90 Days
Send Warning Email Before Deactivating: 7 Days
High Security Configuration
Disable User if Inactive For: 45 Days
Send Warning Email Before Deactivating: 7 Days
MSP / Service Provider Configuration
Disable User if Inactive For: 60 Days
Send Warning Email Before Deactivating: 14 Days
A logical relationship is essential Warning Days must definitely be less than the Disable Days value. A “Disable: 30 days, Warning: 30 days” configuration means it’s already too late when the warning arrives. “Disable: 30 days, Warning: 60 days” is illogical—the warning is triggered while the user is not yet dormant.
The basic rule is simple: Warning < Disable
The quality of the warning email is also very important. It should clearly tell the user: when the account will be deactivated, since when they have not logged in, what they need to do to prevent deactivation, and to whom they can address their questions. A well-written warning email significantly reduces the help desk burden.
D) Email Settings
Email Settings includes Morpheus’s SMTP configuration. System notifications, password reset emails, user approvals, alarm notifications, incident messages, and dormant account warnings depend on this configuration.
In a Morpheus environment where SMTP configuration has not been done or has been done incorrectly, operational communication can be seriously disrupted.
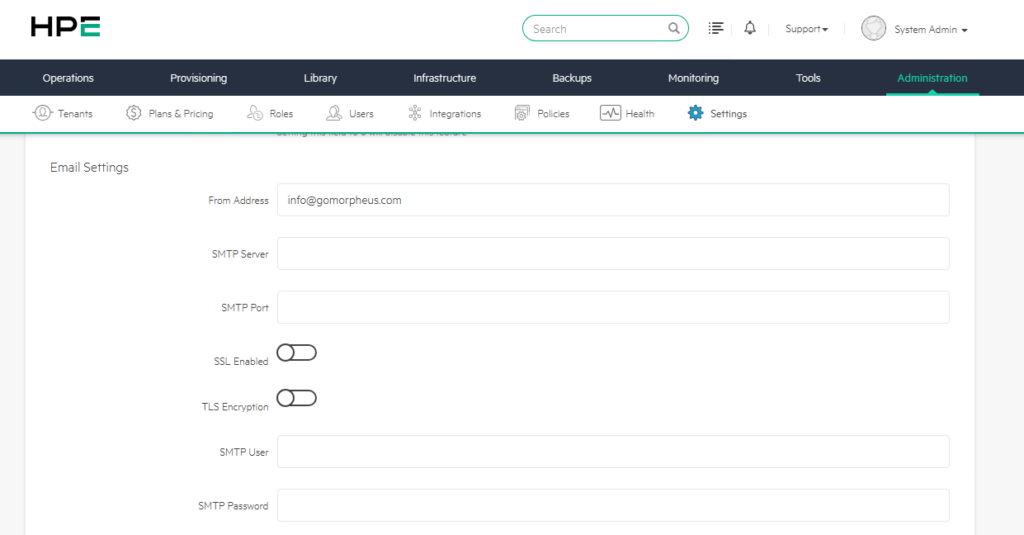
1) From Address
Determines from which address emails will be sent. The default value is info@gomorpheus.com, which is a factory setting.
In production, you must use an address from your own domain; otherwise, emails will fail SPF/DKIM verification and end up in spam folders.
A typical corporate configuration: service account addresses such as morpheus@company.com or no-reply-morpheus@company.com.
Recommendation: A corporate address should be used. For example:
morpheus@company.com
cloud-platform@company.com
no-reply-morpheus@company.com
The correct configuration of SPF, DKIM, and DMARC records for this address is also important.
2) SMTP Server and SMTP Port
The SMTP Server specifies the server from which emails will be sent. The SMTP Port is the port on which the relevant service listens.
Common usage:
Port 25: Internal relay Port 465: SSL SMTP Port 587: STARTTLS SMTP
Recommendation: In modern architectures, port 587 and TLS Encryption should generally be preferred.
3) SSL Enabled and TLS Encryption
SSL Enabled ensures that the connection is established directly with SSL. TLS Encryption ensures that the connection is encrypted later with the STARTTLS logic.
Common usage for Microsoft 365, SendGrid, and many modern SMTP services:
SSL Enabled: OFF TLS Encryption: ON Port: 587
Recommendation: SMTP traffic should not be left unencrypted. Even if a corporate SMTP relay is used, TLS should be enabled if possible.
SSL Enabled (implicit SSL) ensures the connection is established encrypted from the start, on port 465. TLS Encryption (STARTTLS / explicit TLS) starts the connection in plain text first, then upgrades it to TLS, on port 587. The modern best practice is the combination of 587 + TLS Encryption.
4) SMTP User and SMTP Password
These fields are filled in if SMTP authentication is required. In cloud-based SMTP providers, username and app password or API key are often used.
Recommendation: The SMTP password should not belong to a personal user account. A service account or application password should be used. Password rotation should be applied if possible.
Ready Configurations for Common Scenarios
Scenario 1: Internal Exchange Relay
From Address: morpheus@company.local
SMTP Server:  smtp-relay.company.local
SMTP Port:    587
SSL Enabled:  OFF
TLS Encryption: ON
SMTP User:    morpheus-svc@company.local
SMTP Password: [Strong password — from Vault]
Scenario 2: Microsoft 365
From Address: morpheus@company.com
SMTP Server:  smtp.office365.com
SMTP Port:    587
SSL Enabled:  OFF
TLS Encryption: ON
SMTP User:    morpheus@company.com
SMTP Password: [App Password — for MFA account]
Critical note for Microsoft 365!!! For accounts with MFA active, the password does not work directly. You need to generate an App Password from the Microsoft 365 admin panel or set up an OAuth2/Modern Authentication-based relay structure. Basic Authentication has been deprecated by Microsoft.
Scenario 3: SendGrid (Cloud Native)
From Address: morpheus@company.com
SMTP Server:  smtp.sendgrid.net
SMTP Port:    587
SSL Enabled:  OFF
TLS Encryption: ON
SMTP User:    apikey   (literally type "apikey")
SMTP Password: [SendGrid API Key]
Troubleshooting If Email Doesn’t Go Out
If the SMTP configuration looks correct but email isn’t going out, the troubleshooting flow generally consists of three steps:
1) Check Morpheus Logs
# UI logs
tail -f /var/log/morpheus/morpheus-ui/current

# Error keywords to look for
– "SMTP"
– "MailService"
– "Authentication failed"
– "Connection refused"
– "SSL handshake"
2) Test Network Access
# Port test from appliance to SMTP server
telnet smtp-relay.onecloudlab.local 587
nc -zv smtp.office365.com 587
3) Verify DNS Resolution
nslookup smtp.office365.com
dig smtp-relay.onecloudlab.local
In most cases, the issue is either a firewall rule blocking port 587 or authentication credentials being rejected (especially in Microsoft 365 because an App Password is not being used).
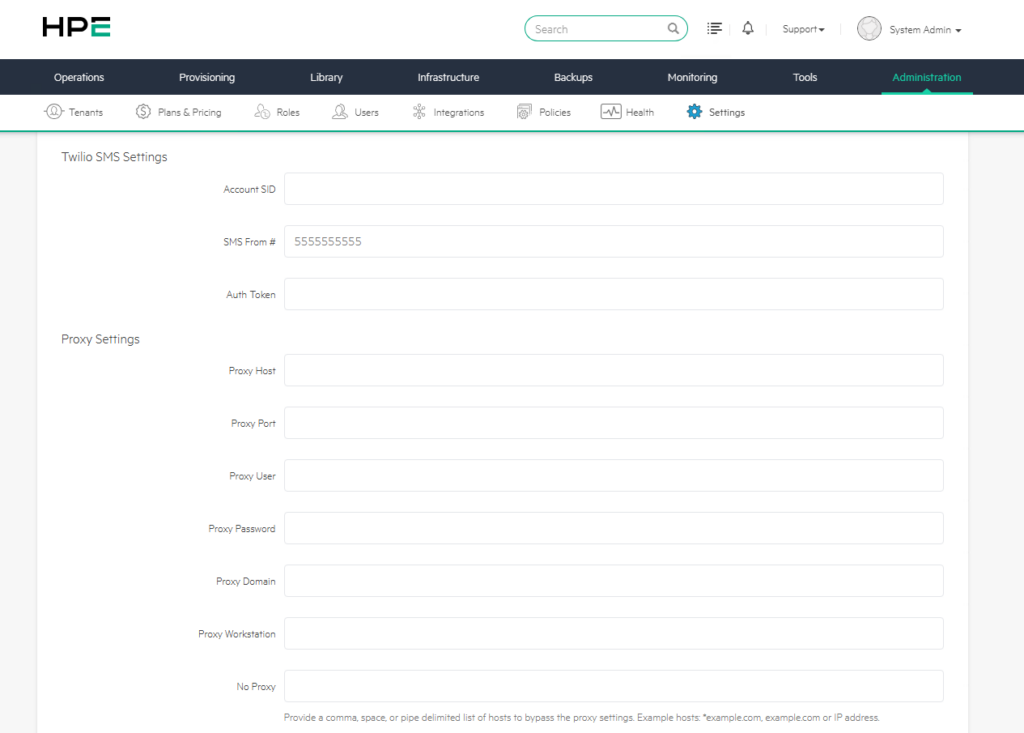
E) Twilio SMS Settings
Twilio SMS Settings enables Morpheus to send SMS-based notifications. In addition to email, SMS notifications can also be used for critical incidents, alarms, or operational warnings.
Twilio is a cloud-based communications platform (CPaaS — Communications Platform as a Service). It allows you to programmatically send SMS, MMS, voice calls, WhatsApp messages, and video communications. On the Morpheus side, filling in three fields is sufficient.
| Field | Description | Where to Get It |
|---|---|---|
| Account SID | Unique identifier of your Twilio account | Twilio Console → Dashboard |
| SMS From | Number from which messages will be sent | Number purchased from Twilio |
| Auth Token | API authentication key | Twilio Console → Account Info |
1) Account SID
The unique identifier of the Twilio account. Obtained through the Twilio Console.
2) SMS From
Specifies from which phone number the SMS will be sent. The value 5555555555 in the documentation is an example or placeholder value.
3) Auth Token
The secret token used for Twilio API access.
Recommendation: The Auth Token should be treated as sensitive information. It should not be shared with unauthorized persons, should be regularly rotated, and should be protected with a secret management approach if possible.
SMS notifications are particularly useful in critical systems, but sending SMS for every alarm can tire users. For this reason, SMS should only be preferred for high-priority events.
Routing all alarms to SMS leads users to notification fatigue in a short time and causes them not to respond in genuinely critical situations.
Use SMS only for P1/critical-level events (production down, critical capacity threshold, security breach). Email or Slack/Teams integration is sufficient for the rest.
F) Proxy Settings
Includes the proxy configuration that Morpheus will use for all outbound traffic to the outside world. In corporate environments, especially in architectures where internet access goes through a central proxy, it is a critical tab. Incorrect configuration can silently break everything from plugin updates to cloud provider integrations.
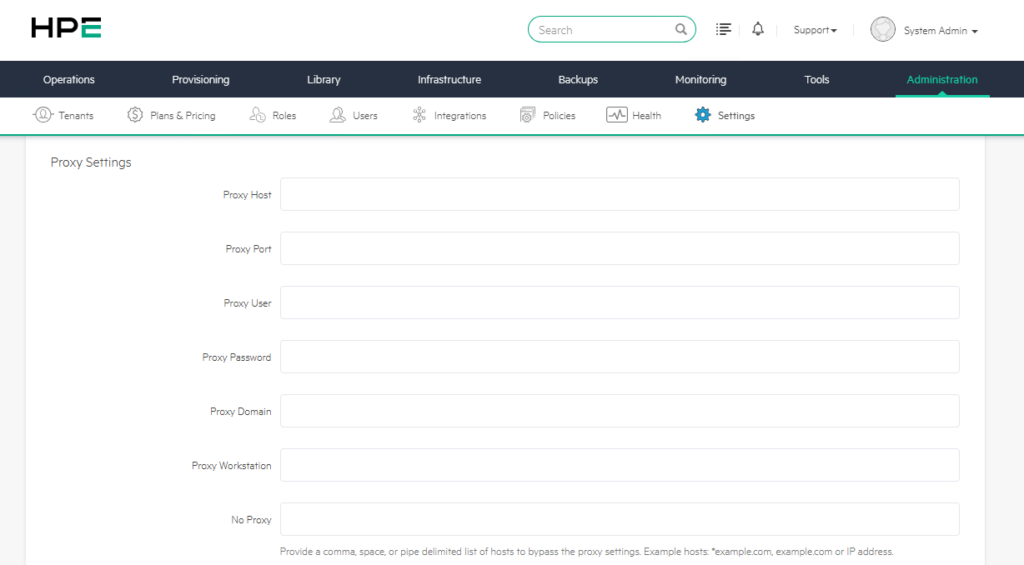
1) Basic Fields
| Field | Meaning |
|---|---|
| Proxy Host | The proxy server’s address (IP or FQDN) |
| Proxy Port | The port the proxy listens on (usually 3128, 8080) |
| Proxy User | Username for authentication |
| Proxy Password | Password for authentication |
| Proxy Domain | Windows domain name for NTLM authentication |
| Proxy Workstation | Workstation/computer name for NTLM |
2) NTLM Authentication Note
The Proxy Domain and Proxy Workstation fields are only for proxies that use NTLM authentication. While basic authentication or Kerberos is generally preferred in modern corporate environments, there are still environments using NTLM proxies. The Workstation field is used to report client identity to the NTLM protocol and is important for audit/logging purposes.
3) No Proxy — The Most Frequently Overlooked Field
If this field is neglected… Morpheus needs to bypass the proxy for its own internal services and internal network resources. Otherwise, the appliance will try to reach even its own worker nodes or internal DNS servers through the proxy.
Result: timeouts, delays, and connection errors that are difficult to understand.
Typical addresses to be added to the No Proxy field:
- Localhost and loopback: localhost, 127.0.0.1
- Internal domains: *.company.local, *.internal.company.com
- Internal IP block: 10.0.0.0/8, 192.168.0.0/16, 172.16.0.0/12
- Morpheus workers and database servers (if any)
- Internal cloud integration endpoints (vCenter, internal APIs)
An example No Proxy value:
localhost,127.0.0.1,10.0.0.0/8,172.16.0.0/12,192.168.0.0/16,.company.local,vcenter01.company.localG) Currency Settings
Currency Settings manages Morpheus’s exchange rate integrations. It is an important section for cost management in multi-cloud and multi-currency environments.
In corporate architectures, costs coming from different platforms may be in different currencies. For example, the AWS bill may be in USD, the Azure bill in EUR, and local data center costs in TRY. However, the finance department may want to see all costs in TRY.
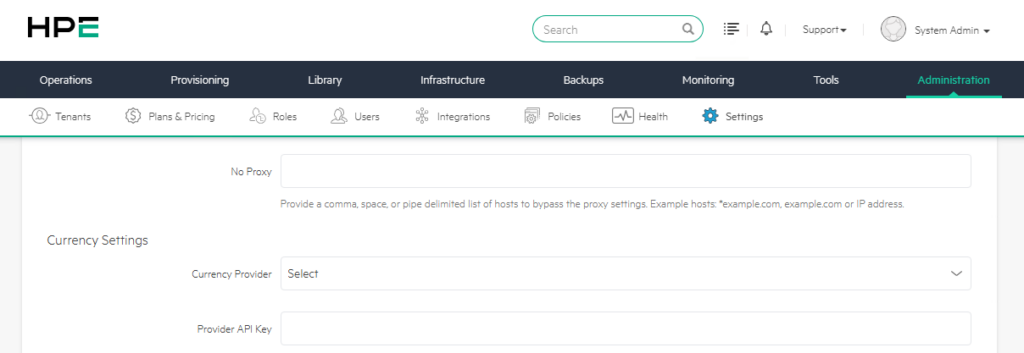
Why Is Multi-Currency Necessary?
A typical corporate scenario looks like this: $50,000 monthly cost in AWS, €18,000 cost in Azure, 2,500,000 TL monthly operational cost in the on-premise VMware inventory. The annual budget is made in TL, but the invoice sources are in different currencies. Performing manual conversion every month without currency provider integration is both error-prone and weakly auditable.
Morpheus solves this problem with automatic exchange rate updates. When a currency provider is selected, the system pulls current rates via API at a specified frequency and automatically applies the conversion to all cost reports.
Currency Provider
The Currency Provider determines from which external provider the exchange rate data will be obtained. Services such as Open Exchange Rates or Fixer.io can be used.
Provider API Key
The key required to access the selected currency provider’s API.
Recommendation: When choosing a currency provider, API limits, update frequency, supported currencies, and reliability should be evaluated. The source from which the rates used for financial reporting come should be documented.
Beware of API rate limits Most free tiers have monthly or daily call limits (for example, the Open Exchange Rates free plan is generally limited to 1000 calls per month).
At Morpheus’s default sync frequency, this limit is sufficient, but if you are tracking multiple currencies, consider upgrading your plan.
H) Enabled Clouds
The Enabled Clouds section determines which cloud or hypervisor platforms will be visible in the Morpheus user interface.
Morpheus supports many cloud and virtualization platforms. However, if the organization is not using all of these platforms, unnecessary options appearing in the Add Cloud menu can complicate the user experience.
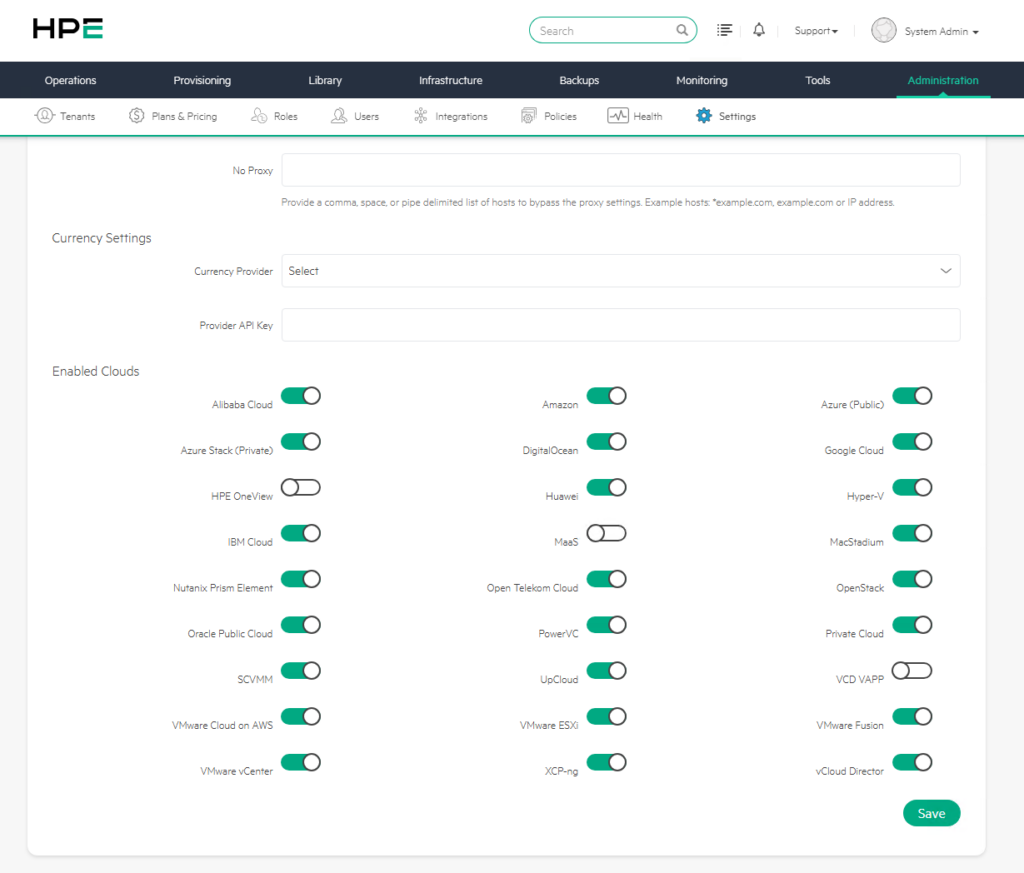
Recommendation: Only cloud types that are actually used or allowed to be used in the organization should be left enabled. This approach reduces operational complexity and lowers the risk of users adding the wrong platform.
For example, in an environment where only VMware, Azure, and Kubernetes are used, other cloud types can be hidden.
Practical UX gain If you are not using anything other than VMware and AWS, there is no benefit in making your users search for “VMware” among 24 options on every add-cloud screen.
By enabling only the clouds actively in use, you significantly simplify the interface and prevent errors caused by selecting the wrong cloud type.
The HPE Morpheus Enterprise Administration Settings screen is a central configuration area that determines not only the basic behaviors of the platform but also its security posture, operational efficiency, integration capabilities, and user experience.
Leaving these settings “at default values” is not the right approach, especially in production environments. Every organization has different security policies, network architecture, user management models, cloud strategies, and compliance requirements. For this reason, Morpheus appliance configuration must also be consciously adapted to these needs.
A correctly configured Morpheus environment ensures more secure agent communication, more controlled tenant management, more effective user policies, healthy notification mechanisms, optimized cloud synchronization, and more accurate cost reporting.
![[TR] HPE Morpheus Enterprise’da Appliance Yönetim Ayarları ve Detayları](https://kadirkozan.com/wp-content/uploads/2026/05/hpe_morpheus-ikona-150x150.jpg)